登录模块
约定路由规则
知道:约定项目的映射规则
| 路由路径 | 路由级别 | 组件功能 |
|---|---|---|
| /login | 1 | 登录 |
| / | 1 | 布局容器 |
| /user | ② | 个人中心 |
| /user/patient | 1 | 家庭档案 |
| /home | ② | 首页 |
| /consult/fast | 1 | 快速问诊 |
| /consult/dep | 1 | 选择科室 |
| /consult/illness | 1 | 病情描述 |
| /consult/pay | 1 | 问诊支付 |
| /room | 1 | 问诊室 |
| /user/consult | 1 | 我的问诊 |
| /user/consult/:id | 1 | 问诊详情 |
| /order/pay | 1 | 药品订单支付 |
| /order/pay/result | 1 | 药品订单支付结果 |
| /order/:id | 1 | 药品订单详情 |
| /order/logistics/:id | 1 | 药品订单物流 |
| /login/callback | 1 | QQ登录回跳 |
| /article | ② | 健康百科 |
| /notify | ② | 消息通知 |
小结:
/是布局容器,是一级路由/home/article/notify/user是二级路由- 他们的配置需要嵌套,其他的页面路由都是一级路由
路由与组件
完成:路由规则的配置,基础组件结构,app组件路由出口
- 基础组件结构
views/Login/index.vue
vue
<script setup lang="ts"></script>

<template>
  <div class="login-page">login</div>
</template>

<style lang="scss" scoped></style>
1
2
3
4
5
6
7
2
3
4
5
6
7
- 路由规则的配置
router/index.ts
ts
routes: [{ path: '/login', component: () => import('@/views/Login/index.vue') }]
1
- app组件路由出口
App.vue
vue
<script setup lang="ts"></script>

<template>
  <router-view></router-view>
</template>
1
2
3
4
5
2
3
4
5
疑问:
- vueps 生成组件基础结构?
- 使用vscode代码片段,或插件
- 每次这样导入 vant 的组件非常麻烦?
- 可以使用自动导入vite插件
组件代码片段
配置:一个vue3页面的基础代码片段
- 打开代码片段设置界面:
- windows:ctrl + shift + p
- mac:cmmmand + shift + p
新建全局代码片段文件
拷贝一下代码,保存即可,输入 vps 即可
json
{
  "Vue 页面 TS 版": {
		"scope": "vue,markdown",
		"prefix": "vpt",
		"body": [
			"<script setup lang=\"ts\"></script>",
			"",
			"<template>",
			"  <div class=\"$1-page\">$1</div>",
			"</template>",
			"",
			"<style lang=\"scss\" scoped></style>",
			""
		],
		"description": "Vue 页面 TS 版"
	}
}
1
2
3
4
5
6
7
8
9
10
11
12
13
14
15
16
17
2
3
4
5
6
7
8
9
10
11
12
13
14
15
16
17
或者安装:vue-vscode-snippets 插件,快捷键可以看插件文档。
自动按需加载
实现:实现自动按需加载,和自动导入
手动按需使用组件比较麻烦,需要先导入。配置函数自动按需导入后直接使用即可。
- 安装:
bash
# 通过 npm 安装
npm i unplugin-vue-components -D
# 通过 yarn 安装
yarn add unplugin-vue-components -D
# 通过 pnpm 安装
pnpm add unplugin-vue-components -D
1
2
3
4
5
6
2
3
4
5
6
- 配置:
ts
import { fileURLToPath, URL } from 'node:url'

import { defineConfig } from 'vite'
import vue from '@vitejs/plugin-vue'
import Components from 'unplugin-vue-components/vite'
import { VantResolver } from 'unplugin-vue-components/resolvers'

// https://vitejs.dev/config/
export default defineConfig({
  plugins: [
    // 解析单文件组件的插件
    vue(),
    // 自动导入的插件,解析器可以是 vant element and-vue
    Components({
      dts: false,
      // 原因:Toast Confirm 这类组件的样式还是需要单独引入,样式全局引入了,关闭自动引入
      resolvers: [VantResolver({ importStyle: false })]
    })
  ],
  resolve: {
    alias: {
      '@': fileURLToPath(new URL('./src', import.meta.url))
    }
  }
})
1
2
3
4
5
6
7
8
9
10
11
12
13
14
15
16
17
18
19
20
21
22
23
24
25
26
2
3
4
5
6
7
8
9
10
11
12
13
14
15
16
17
18
19
20
21
22
23
24
25
26
解释:
@是vite配置的,基于node提供的API,得到src的绝对路径
说明:
- 不开起自动生成声明文件
dts: false - 引入了 vue-router 和 vant 后就拥有了它们组件的类型
- 后期我们自己有全局组件的时候,教大家如何提供组件类型
- 不开起自动生成声明文件
cp-nav-bar 组件结构
掌握:van-nav-bar组件的基础使用,抽取到 cp-nav-bar 组件,作为通用组件
提取原因:
- 样式需要需改
- 项目中使用的 cp-nav-bar 组件功能有相似之处
组件使用:了解 van-nav-bar 组件的基本功能属性文档
抽离组件:components/CpNavBar.vue
vue
<script setup lang="ts">
const onClickLeft = () => {
  // TODO 点击左侧返回按钮
}
const onClickRight = () => {
  // TODO 点击右侧文字按钮
}
</script>

<template>
  <van-nav-bar
    fixed
    left-arrow
    title="登录"
    right-text="注册"
    @click-left="onClickLeft"
    @click-right="onClickRight"
  ></van-nav-bar>
</template>

<style lang="scss" scoped>
:deep() {
  .van-nav-bar {
    &__arrow {
      font-size: 18px;
      color: var(--cp-text1);
    }
    &__text {
      font-size: 15px;
    }
  }
}
</style>
1
2
3
4
5
6
7
8
9
10
11
12
13
14
15
16
17
18
19
20
21
22
23
24
25
26
27
28
29
30
31
32
33
2
3
4
5
6
7
8
9
10
11
12
13
14
15
16
17
18
19
20
21
22
23
24
25
26
27
28
29
30
31
32
33
提问:
- 怎么深度作用其他组件样式?
:deep(){ // 样式 }
cp-nav-bar 组件功能
实现:组件的返回功能,支持 title rightText 属性,支持 click-right 事件
components/CpNavBar.vue
vue
<script setup lang="ts">
import { useRouter } from 'vue-router'

//1. 一定有的功能:返回图标,返回效果,固定定位(组件内部实现)
const router = useRouter()
const onClickLeft = () => {
  // 判断历史记录中是否有回退
  if (history.state?.back) {
    router.back()
  } else {
    router.push('/')
  }
}

// 2. 使用组件时候才能确定的功能:标题,右侧文字,点击右侧文字行为(props传入)
defineProps<{
  title?: string
  rightText?: string
}>()
const emit = defineEmits<{
  (e: 'click-right'): void
}>()
const onClickRight = () => {
  emit('click-right')
}
</script>

<template>
  <van-nav-bar
    left-arrow
    @click-left="onClickLeft"
    fixed
    :title="title"
    :right-text="rightText"
    @click-right="onClickRight"
  ></van-nav-bar>
</template>

<style lang="scss" scoped>
:deep() {
  .van-nav-bar {
    &__arrow {
      font-size: 18px;
      color: var(--cp-text1);
    }
    &__text {
      font-size: 15px;
    }
  }
}
</style>
1
2
3
4
5
6
7
8
9
10
11
12
13
14
15
16
17
18
19
20
21
22
23
24
25
26
27
28
29
30
31
32
33
34
35
36
37
38
39
40
41
42
43
44
45
46
47
48
49
50
51
2
3
4
5
6
7
8
9
10
11
12
13
14
15
16
17
18
19
20
21
22
23
24
25
26
27
28
29
30
31
32
33
34
35
36
37
38
39
40
41
42
43
44
45
46
47
48
49
50
51
views/Login/index.vue
vue
<script setup lang="ts"></script>

<template>
  <div class="login-page">
    <cp-nav-bar title="登录"></cp-nav-bar>
  </div>
</template>

<style lang="scss" scoped></style>
1
2
3
4
5
6
7
8
9
2
3
4
5
6
7
8
9
提问:
怎么在项目中判断是否可以回退?
history.state?.back
怎么定义属性,怎么定义事件
definePropsdefineEmits
为什么可以直接使用组件,不导入不注册?
- 使用了
unplugin-vue-components默认src/compoenents自动导入注册
- 使用了
cp-nav-bar 组件类型
解释:给组件添加类型,让写属性和事件可以有提示
提问:
- vant 的组件为啥有提示?
- 看下 vant 的组件类型声明文件
发现:
ts
// 核心代码
// 1. 导入组件实例
import NavBar from './NavBar.vue'
// 2. 声明 vue 类型模块
declare module 'vue' {
    // 3. 给 vue  添加全局组件类型,interface 和之前的合并
    interface GlobalComponents {
        // 4. 定义具体组件类型,typeof 获取到组件实例类型
        // typeof 作用是得到对应的TS类型
        VanNavBar: typeof NavBar;
    }
}
1
2
3
4
5
6
7
8
9
10
11
12
2
3
4
5
6
7
8
9
10
11
12
给 cp-nav-bar 组件添加类型
types/components.d.ts
ts
import CpNavBar from '@/components/CpNavBar.vue'

declare module 'vue' {
  interface GlobalComponents {
    CpNavBar: typeof CpNavBar
  }
}
1
2
3
4
5
6
7
2
3
4
5
6
7
验证:看看属性提示,事件提示,鼠标放上去有没有类型。
小结:
- 怎么给全局的组件提供类型?
- 写一个类型声明文件,
declare module 'vue'声明一个 vue 类型模块 - 然后
interface GlobalComponents书写全局组件的类型 - key组件名称支持大驼峰,value是组件类型,通过 typeof 组件实例得到
- 写一个类型声明文件,
页面布局
- 准备全局重置样式
style/main.scss
css
// 全局样式
body {
  font-size: 14px;
  color: var(--cp-text1);
}
a {
  color: var(--cp-text2);
}
h1,h2,h3,h4,h5,h6,p,ul,ol {
  margin: 0;
  padding: 0;
}
1
2
3
4
5
6
7
8
9
10
11
12
2
3
4
5
6
7
8
9
10
11
12
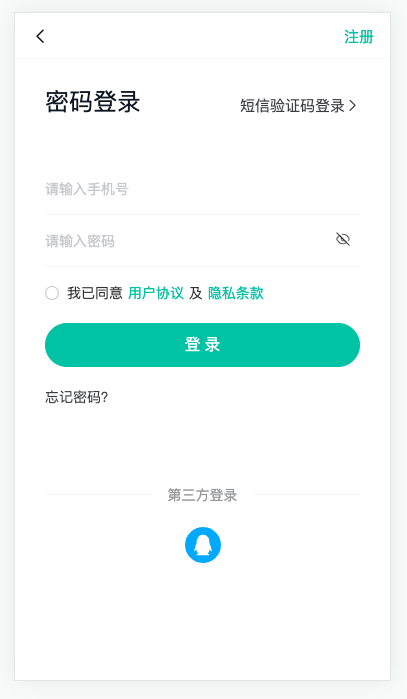
- 登录页面整体结构
vies/Login/index.vue
vue
<script setup lang="ts"></script>

<template>
  <div class="login-page">
    <cp-nav-bar
      right-text="注册"
      @click-right="$router.push('/register')"
    ></cp-nav-bar>
    <!-- 头部 -->
    <div class="login-head">
      <h3>密码登录</h3>
      <a href="javascript:;">
        <span>短信验证码登录</span>
        <van-icon name="arrow"></van-icon>
      </a>
    </div>
    <!-- 表单 -->
    <van-form autocomplete="off">
      <van-field placeholder="请输入手机号" type="tel"></van-field>
      <van-field placeholder="请输入密码" type="password"></van-field>
      <div class="cp-cell">
        <van-checkbox>
          <span>我已同意</span>
          <a href="javascript:;">用户协议</a>
          <span>及</span>
          <a href="javascript:;">隐私条款</a>
        </van-checkbox>
      </div>
      <div class="cp-cell">
        <van-button block round type="primary">登 录</van-button>
      </div>
      <div class="cp-cell">
        <a href="javascript:;">忘记密码?</a>
      </div>
    </van-form>
    <!-- 底部 -->
    <div class="login-other">
      <van-divider>第三方登录</van-divider>
      <div class="icon">
        <img src="@/assets/qq.svg" alt="" />
      </div>
    </div>
  </div>
</template>

<style lang="scss" scoped>
.login {
  &-page {
    padding-top: 46px;
  }
  &-head {
    display: flex;
    padding: 30px 30px 50px;
    justify-content: space-between;
    align-items: flex-end;
    line-height: 1;
    h3 {
      font-weight: normal;
      font-size: 24px;
    }
    a {
      font-size: 15px;
    }
  }
  &-other {
    margin-top: 60px;
    padding: 0 30px;
    .icon {
      display: flex;
      justify-content: center;
      img {
        width: 36px;
        height: 36px;
        padding: 4px;
      }
    }
  }
}
.van-form {
  padding: 0 14px;
  .cp-cell {
    height: 52px;
    line-height: 24px;
    padding: 14px 16px;
    box-sizing: border-box;
    display: flex;
    align-items: center;
    .van-checkbox {
      a {
        color: var(--cp-primary);
        padding: 0 5px;
      }
    }
  }
  .btn-send {
    color: var(--cp-primary);
    &.active {
      color: rgba(22,194,163,0.5);
    }
  }
}
</style>
1
2
3
4
5
6
7
8
9
10
11
12
13
14
15
16
17
18
19
20
21
22
23
24
25
26
27
28
29
30
31
32
33
34
35
36
37
38
39
40
41
42
43
44
45
46
47
48
49
50
51
52
53
54
55
56
57
58
59
60
61
62
63
64
65
66
67
68
69
70
71
72
73
74
75
76
77
78
79
80
81
82
83
84
85
86
87
88
89
90
91
92
93
94
95
96
97
98
99
100
101
102
2
3
4
5
6
7
8
9
10
11
12
13
14
15
16
17
18
19
20
21
22
23
24
25
26
27
28
29
30
31
32
33
34
35
36
37
38
39
40
41
42
43
44
45
46
47
48
49
50
51
52
53
54
55
56
57
58
59
60
61
62
63
64
65
66
67
68
69
70
71
72
73
74
75
76
77
78
79
80
81
82
83
84
85
86
87
88
89
90
91
92
93
94
95
96
97
98
99
100
101
102
- 定制样式
style/main.scss
scss
  // 覆盖vant主体色
  --van-primary-color: var(--cp-primary);
  // 单元格上下间距
  --van-cell-vertical-padding: 14px;
  // 复选框大小
  --van-checkbox-size: 14px;
  // 默认按钮文字大小
  --van-button-normal-font-size: 16px;
1
2
3
4
5
6
7
8
2
3
4
5
6
7
8
表单校验
实现:单个表单项校验,以及整体表单校验
- 提取表单校验规则(为了其他页面复用)
utils/rules.ts
ts
// 表单校验
const mobileRules = [
  { required: true, message: '请输入手机号' },
  { pattern: /^1[3-9]\d{9}$/, message: '手机号格式不正确' }
]

const passwordRules = [
  { required: true, message: '请输入密码' },
  { pattern: /^\w{8,24}$/, message: '密码需8-24个字符' }
]

export { mobileRules, passwordRules }
1
2
3
4
5
6
7
8
9
10
11
12
2
3
4
5
6
7
8
9
10
11
12
- 单个表单项校验
Login/index.vue
ts
import { mobileRules, passwordRules } from '@/utils/rules'
1
diff
+      <van-field v-model="mobile" :rules="mobileRules" placeholder="请输入手机号" type="tel"></van-field>
      <van-field
        v-model="password"
+        :rules="passwordRules"
        placeholder="请输入密码"
        :type="show ? 'text' : 'password'"
      >
1
2
3
4
5
6
7
2
3
4
5
6
7
- 以及整体表单校验
Login/index.vue
设置button组件为原生 submit 类型按钮
html
<van-button block round type="primary" native-type="submit"> 登 录 </van-button>
1
监听表单校验成功后 submit 事件
html
<van-form autocomplete="off" @submit="login">
1
ts
// 表单提交
const login = () => {
  if (!agree.value) return Toast('请勾选我已同意')
  // 验证完毕,进行登录
}
1
2
3
4
5
2
3
4
5
小结:
- 怎么给单个表单加校验?
- reules 属性,规则和 element-ui 类似
- 怎么给整个表单加校验?
- 按钮组件设置
native-type="submit",表单组件绑定@submit事件
- 按钮组件设置
密码登录
实现:通过手机号和密码进行登录
温馨提示
- 提供了100个测试账号
- 手机号:13230000001 - 13230000100
- 密码:abc12345
登录逻辑:
- 定义一个 api 接口函数
- 登录成功:
- 存储用户信息
- 回跳页面,或者进入个人中心
- 提示
落地代码:
- api函数
services/user.ts
ts
import type { User } from '@/types/user'
import { request } from '@/utils/request'

// 密码登录
export const loginByPassword = (mobile: string, password: string) =>
  request<User>('/login/password', 'POST', { mobile, password })
1
2
3
4
5
6
2
3
4
5
6
- 进行登录
Login/index.vue
ts
import { loginByPassword } from '@/services/login'
import { useUserStore } from '@/stores'
import { useRoute, useRouter } from 'vue-router'
1
2
3
2
3
ts
const store = useUserStore()
const router = useRouter()
const route = useRoute()
// 表单提交
const login = async () => {
  if (!agree.value) return Toast('请勾选我已同意')
  // 验证完毕,进行登录
  const res = await loginByPassword(mobile.value, password.value)
  store.setUser(res.data)
  // 如果有回跳地址就进行回跳,没有跳转到个人中心
  router.push((route.query.returnUrl as string) || '/user')
  Toast.success('登录成功')
}
1
2
3
4
5
6
7
8
9
10
11
12
13
2
3
4
5
6
7
8
9
10
11
12
13
短信登录-切换效果
实现:添加短信登录与密码登录界面切换,添加code的校验
步骤:
- 完成界面切换
- 完成code校验
代码:
1)完成界面切换 Login/index.vue
- 切换数据
ts
const isPass = ref(true)
1
- 标题切换
html
    <div class="login-head">
      <h3>{{ isPass ? '密码登录' : '短信验证码登录' }}</h3>
      <a href="javascript:;" @click="isPass = !isPass">
        <span>{{ !isPass ? '密码登录' : '短信验证码登录' }}</span>
        <van-icon name="arrow"></van-icon>
      </a>
    </div>
1
2
3
4
5
6
7
2
3
4
5
6
7
- 表单项切换
html
      <van-field
        v-if="isPass"
        v-model="password"
        :rules="passwordRules"
        placeholder="请输入密码"
        :type="show ? 'text' : 'password'"
      >
        <template #button>
          <cp-icon @click="show = !show" :name="`login-eye-${show ? 'on' : 'off'}`"></cp-icon>
        </template>
      </van-field>
      <van-field v-else placeholder="短信验证码">
        <template #button>
          <span class="btn-send">发送验证码</span>
        </template>
      </van-field>
1
2
3
4
5
6
7
8
9
10
11
12
13
14
15
16
2
3
4
5
6
7
8
9
10
11
12
13
14
15
16
2)完成code校验
- 校验规则
utils/rules.ts
ts
const codeRules = [
  { required: true, message: '请输入验证码' },
  { pattern: /^\d{6}$/, message: '验证码6个数字' }
]

export { mobileRules, passwordRules, codeRules }
1
2
3
4
5
6
2
3
4
5
6
- 使用规则
Login/index.vue
ts
import { mobileRules, passwordRules, codeRules } from '@/utils/rules'
1
ts
const code = ref('')
1
html
<van-field v-else v-model="code" :rules="codeRules" placeholder="短信验证码">
1
小结:
- 接下来就是实现
发送短信和合并短信登录的功能了
短信登录-发送短信
实现:点击按钮发送验证码功能
步骤:
- API 接口函数
- 发送验证码逻辑
- 倒计时逻辑
代码:
1)API 接口函数
- 类型
types/user.d.ts
ts
// 短信验证码类型,登录|注册|修改手机号|忘记密码|绑定手机号
export type CodeType = 'login' | 'register' | 'changeMobile' | 'forgetPassword' | 'bindMobile'
1
2
2
- 接口
services/user.ts
diff
+import type { CodeType, User } from '@/types/user'
import { request } from '@/utils/request'

// 密码登录
export const loginByPassword = (mobile: string, password: string) =>
  request<User>('/login/password', 'POST', { mobile, password })

+// 发送验证码
+export const sendMobileCode = (mobile: string, type: CodeType) =>
+  request('/code', 'GET', { mobile, type })
1
2
3
4
5
6
7
8
9
10
2
3
4
5
6
7
8
9
10
2)发送验证码逻辑
- 校验没在倒计时
html
<span class="btn-send" @click="send">发送验证码</span>
1
ts
const time = ref(0)
const send = async () => {
  // 已经倒计时time的值大于0,此时不能发送验证码
  if (time.value > 0) return
}
1
2
3
4
5
2
3
4
5
- 校验手机表单项 使用 form 组件的函数 参考文档
diff
      <van-field
        v-model="mobile"
+        name="mobile"
        :rules="mobileRules"
        placeholder="请输入手机号"
        type="tel"
      ></van-field>
1
2
3
4
5
6
7
2
3
4
5
6
7
ts
import { Toast, type FormInstance } from 'vant'
1
diff
+const form = ref<FormInstance>()
const time = ref(0)
const send = async () => {
  if (time.value > 0) return
+  // 验证不通过报错,阻止程序继续执行
+  await form.value?.validate('mobile')
}
1
2
3
4
5
6
7
2
3
4
5
6
7
- 发送短信验证码
ts
import { loginByPassword, sendMobileCode } from '@/services/user'
1
diff
const send = async () => {
  if (time.value > 0) return
  await form.value?.validate('mobile')
+  await sendMobileCode(mobile.value, 'login')
+  Toast.success('发送成功')
}
1
2
3
4
5
6
2
3
4
5
6
3)倒计时逻辑
- 逻辑代码
diff
const form = ref<FormInstance>()
const time = ref(0)
+let timeId: number
const send = async () => {
  if (time.value > 0) return
  await form.value?.validate('mobile')
  await sendMobileCode(mobile.value, 'login')
  Toast.success('发送成功')
  time.value = 60
+  // 倒计时
+  clearInterval(timeId)
+  timeId = window.setInterval(() => {
+    time.value--
+    if (time.value <= 0) window.clearInterval(timeId)
+  }, 1000)
}
+onUnmounted(() => {
+  window.clearInterval(timeId)
+})
1
2
3
4
5
6
7
8
9
10
11
12
13
14
15
16
17
18
19
2
3
4
5
6
7
8
9
10
11
12
13
14
15
16
17
18
19
注意:
组件卸载关闭定时器
定时器相关函数是 window 去调用,因为 node 也有定时器返回类型不一样。
界面展示
html
<span class="btn-send" :class="{ active: time > 0 }" @click="send">
  {{ time > 0 ? `${time}s后再次发送` : '发送验证码' }}
</span>
1
2
3
2
3
短信登录-进行登录
实现:通过短信进行登录
步骤:
- api 接口函数
- 合并到密码登录逻辑中
代码:
- 接口API
services/user.ts
ts
// 短信登录
export const loginByMobile = (mobile: string, code: string) =>
  request<User>('/login', 'POST', { mobile, code })
1
2
3
2
3
- 合并短信登录
ts
import { loginByPassword, sendMobileCode, loginByMobile } from '@/services/user'
1
diff
// 表单提交
const login = async () => {
  if (!agree.value) return Toast('请勾选我已同意')
  // 验证完毕,进行登录
+  const res = isPass.value
+    ? await loginByPassword(mobile.value, password.value)
+    : await loginByMobile(mobile.value, code.value)
  store.setUser(res.data)
  // 如果有回跳地址就进行回跳,没有跳转到个人中心,replace目的 a => login  => b  变成 a => b
  router.replace((route.query.returnUrl as string) || '/user')
  Toast.success('登录成功')
}
1
2
3
4
5
6
7
8
9
10
11
12
2
3
4
5
6
7
8
9
10
11
12
小结:
- 处理接口和传参不一样,成功后的逻辑都一样的。
图标组件-打包svg地图
实现:根据 icons 文件svg图片打包到项目中,通过组件使用图标
- 安装插件
bash
yarn add vite-plugin-svg-icons -D
# or
npm i vite-plugin-svg-icons -D
# or
pnpm install vite-plugin-svg-icons -D
1
2
3
4
5
2
3
4
5
- 使用插件
vite.config.ts
diff
import { VantResolver } from 'unplugin-vue-components/resolvers'
+import { createSvgIconsPlugin } from 'vite-plugin-svg-icons'
+import path from 'path'

// https://vitejs.dev/config/
export default defineConfig({
  plugins: [
    vue(),
    Components({
      dts: false,
      resolvers: [VantResolver({ importStyle: false })]
    }),
+    createSvgIconsPlugin({
+      // 指定图标文件夹,绝对路径(NODE代码)
+      iconDirs: [path.resolve(process.cwd(), 'src/icons')]
+    })
  ],
1
2
3
4
5
6
7
8
9
10
11
12
13
14
15
16
17
2
3
4
5
6
7
8
9
10
11
12
13
14
15
16
17
- 导入到main
diff
import router from './router'
+import 'virtual:svg-icons-register'

import 'vant/lib/index.css'
1
2
3
4
2
3
4
- 使用svg精灵地图
xml
    <svg aria-hidden="true">
      <!-- #icon-文件夹名称-图片名称 -->
      <use href="#icon-login-eye-off" />
    </svg>
1
2
3
4
2
3
4
小结:
icons文件打包的产物?
- 会生成一个 svg 结构(js创建的)包含所有图标,理解为
精灵图
- 会生成一个 svg 结构(js创建的)包含所有图标,理解为
怎么使用svg图标?
- 通过 svg 标签
#icon-文件夹名称-图片名称指定图片,理解精灵图定位坐标
- 通过 svg 标签
图标组件-封装svg组件
实现:把 svg 标签使用图标封装起来,使用组件完成密码可见切换功能。
- 组件
components/CpIcon.vue
vue
<script setup lang="ts">
// 提供name属性即可
defineProps<{
  name: string
}>()
</script>

<template>
  <svg aria-hidden="true" class="cp-icon">
    <use :href="`#icon-${name}`" />
  </svg>
</template>

<style lang="scss" scoped>
.cp-icon {
  // 和字体一样大
  width: 1em;
  height: 1em;
}
</style>
1
2
3
4
5
6
7
8
9
10
11
12
13
14
15
16
17
18
19
20
2
3
4
5
6
7
8
9
10
11
12
13
14
15
16
17
18
19
20
- 类型
types/components.d.ts
ts
import CpNavBar from '@/components/CpNavBar.vue'
import CpIcon from '@/components/CpIcon.vue'

declare module 'vue' {
  interface GlobalComponents {
    CpNavBar: typeof CpNavBar
    CpIcon: typeof CpIcon
  }
}
1
2
3
4
5
6
7
8
9
2
3
4
5
6
7
8
9
提示:
- 有些图标可以根据 style 中
color的值来设置颜色,图标是否有这个功能取决于 UI 做图片时否开启。
实现切换密码可见功能:Login/index.vue
ts
// 表单数据
const mobile = ref('')
const password = ref('')
// 控制密码是否显示
const show = ref(false)
1
2
3
4
5
2
3
4
5
html
<van-field v-model="mobile" placeholder="请输入手机号" type="tel"></van-field>
<van-field v-model="password" placeholder="请输入密码" :type="show ? 'text' : 'password'">
  <template #button>
    <cp-icon @click="show = !show" :name="`login-eye-${show ? 'on' : 'off'}`"></cp-icon>
  </template>
</van-field>
1
2
3
4
5
6
2
3
4
5
6
补充:
- 为什么可以在
cp-icon上可以使用@click呢,以前vue2中,组件要么实现子传父,要么使用.native修饰符 - 因为vue3废弃了native修饰符,它将把它们作为原生事件监听器添加到子组件的根元素中,详细请看迁移文档
小结:
- 表单绑定数据后,通过 show 切换 text 和 password,对应切换图标组件的 name 即可。